| 8 Backup and Recovery |
|---|
| Back to TOC |
An important feature of each database system is the ability to save consistent backups and to enable the database administrator to restore the datase in a fast and consistent way.
Cego provides several ways for saving and restoring user data. Each method has its advantages and disadvantages so it must be decided for each situation, which is the appropriate way. In the following chapter, all backup methods are explained to allow the administrator to choose the appropriate one.
8.1 Export and import
The most simple way to save and restore database data is implemented with the export and import function. If a tableset export is performed, all currently available tableset objects are written to a dump file, which can be reloaded later on again.
Cego provides three modes of doing data import and export.
- XML mode
- Binary mode
- Plain mode
While the XML file is platform independent, the binary mode and plain modes are not. So if the dump file should be used to build up a copy of the database on a machine with a different architecture, XML mode is the only option. However, the export and import performance of XML mode is much slower than using plain or binary mode.
The difference between binary and plain is, that plain export stores each row of a table in one piece to the dump file. As a consequence, plain mode is more faster than binary mode, but has some restrictions. Tables which contain blobs can not be dumped in plain mode and no table reorganisation is done when export and import is exported with plain export mode.
For a detailed description how to export and import tableset data, please check out the import and export section in the chapter for the cgadm admin client.
Although if the export and import methods are convenient options to back up any database tablesets or tables, there are some limitations. The export method is not transaction save, which means, that any transactions that were executed after starting the export procedure could be lost. In this sense, export methods are not appropriate for any point-in-time recovery actions.
8.2 Advanced methods
Before the advanced data backup method are discussed, let's first discuss some architectural basics for this.
Each executed transaction is first written in a so-called online redo log file. This file is written sequentially, but is limited to a fixed length. When the end of the file is reached, the file is closed and move to the next cycle. The number of online redo logs is fixed and must be defined when creating the database. Thus, the online redo logs are overwritten cyclically.
To save the log files already written before writing again, the database must be run in archive mode. With activated archive mode, all written entirely online redo log files are saved in the archive area. If all online redo log files are backed up to the archive area, this will contain a complete history of all transactions carried out.
For more information about setting up the database archiving mode, please see section Archive log mode at the description of the admin manager cgadm.
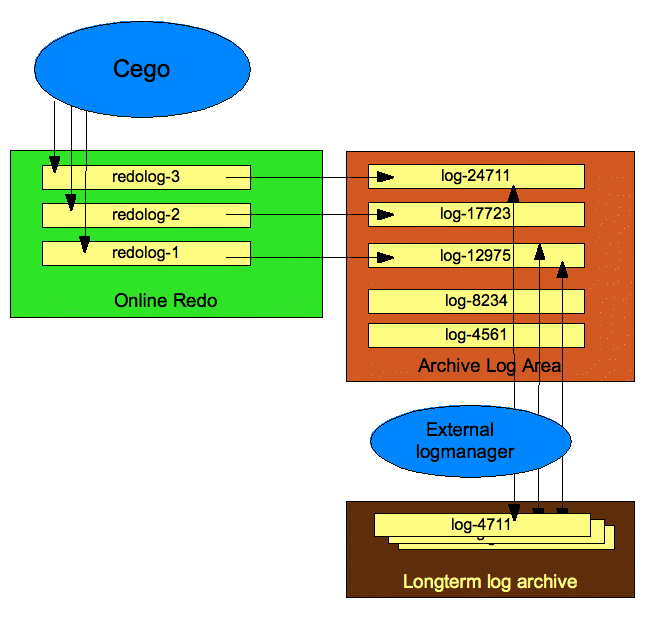 |
In general, however, the size of the archive area is limited. The log files that were copied to the archive area, have to be migrated to a third storage medium. This migration process is highly dependent on the choice of the third storage medium and is not part of the actual database functionality.The migration is controlled by an external log manager.
To recover from a database backup, a subsequent sequence of all log files is required, which have been written after the corresponding online backup was done. If log files have already been migrated to the third storage, these log files must be made available in the archive area again. The retrieve the log files is performed by the external LogManager. It is triggered for the respective files required by the database.
The basic architectural features and principles were explained thus. The next chapter will now be introduced to the various backup and restore procedures.
8.2.1 Offline backup
The first method to backup a tableset is to create an offline file backup. For this, the tableset must be offline where all tableset files are in a consistent state. Then, the backup can be perfomed on filesystem level using standard file archiving utilies ( tar, zp, cpio, ... ). For a complete backup, the following files should be saved
- XML configuration file
- All Tableset system file ( cego_<tableset>.sys )
- All Tableset temp file ( cego_<tableset>.temp )
- All Tableset data files ( <datafile 1> - <datafile N> )
The names of the database files must correspond with your definitions from the cego XML configuration file (cegodb.xml)
If the backup has been finished, the database can be started again and the operation can be continued. Normally offline backups are performed, if an appropriate planned downtime is available and a backup for a fast database restore is required ( e.g. a database copy ).
An offline backup requires the backup of all configured tablesets in the database. Since the database configuration file contains information of all tablesets in one file, all tablesets must be offline to save a consistent version of this file. A more sophisticated way to backup a dedicated tableset is described in the following with the online backup method.
8.2.2 Online backup
For high available database systems, it is often difficult to get any downtime to perform an offline backup. In this case, the database also must provide a way to perform backups while running and allow to restore this data consistently.
Cego provides two ways of doing an online backup.
8.2.2.1 External backup
A common way to perform online backups is just to save the current active datafiles and restore all written blocks to the original state later on by the recovery procedure. For this, all modified blocks of each datafile must be saved to the database logfiles. Later on, while the database is recovered from the restored datafiles, the saved blocks must be copied back to the datafiles.
To perform an online backup with Cego, the corresponding tableset must be set to online backup mode. This is done with the following command
CGADM > begin backup for TS1 message 'backup for demo'; Backup mode started |
The message is optional and can be used to write any appropriate context information to the backup statistics log.
Now the datafiles can be saved to an appropriate backup location. You can list up all relevant datafiles for backup using the following admin command
CGADM > list bufile for TS1; +---------------------+ | BUILEINFO | | FILENAME | +---------------------+ | ./db/tsticket.xml | | ./db/chkdb_TS1.sys | | ./db/chkdb_TS1.temp | | ./db/data01.dbf | +---------------------+ Tableset information retrieved ok ( 0.031 s ) |
Please note, that in addition to the native database files, a backup ticket file is listed. The ticket file contains specific information about the tableset and is restored to the database configuration file during the restore procedure.
From a shell, you can create directly a backup tar file using the following command
$ tar -cvf bu.tar `cgadm --server=localhost --port=2200 --user=cgadm/cgadm --raw --cmd="list bufile for TS1"` |
If an archive manager is registered, the backup can be done directly from the database admin console
CGADM > show backupmng; +--------------------------------+ | ARCHMNGINFO | | ARCHMANAGER | +--------------------------------+ | /usr/local/cgdb/backupManager | +--------------------------------+ Arch Manager Info ok ( 0.000 s ) |
The achive manager is called with the following synopsis
<archive manager program> -t <tableset> [ -b <filelist> ] [ -l ] [ -r <archive id> ] |
#!/bin/bash

TABLESET="NA"

while getopts "t:b:r:l" opt; do
    case $opt in

	t)
	    TABLESET=${OPTARG}
	    ;;
	b)
	    # echo "Option backup was triggered with $OPTARG" >&2
	    BUDATE=`date +%Y%m%d-%H%M`
	    echo "Starting backup .."
	    tar -cvPf ${TABLESET}-${BUDATE}.tar ${OPTARG} 2>&1

	    if [ $? == 0 ]
	    then
		echo "Backup finished successful"
	    else
		echo "Backup failed"
	    fi
	    ;;
	l)
	    for f in `ls ${TABLESET}-*.tar 2> /dev/null`
	    do
		BUTS=`stat -f%SB -t "%Y-%m-%d-%H:%M:%S" $f`
		BUID=`echo $f | sed 's/\.tar//'`
		echo ${BUID},${BUTS}
	    done
	    ;;
	r)
	    echo "Starting restore .."
	    tar -xvPf ${OPTARG}.tar 2>&1
	    if [ $? == 0 ]
	    then
		echo "Restore finished successful"
	    else
		echo "Restore failed"
	    fi
	    ;;
	\?)
	    echo "Invalid option: -$OPTARG" >&2
	    ;;
	:)
	    echo "Option -$OPTARG requires an argument." >&2
	    exit 1
	    ;;
    esac
done
|
The backup manager then can be set up with
CGADM > set backupmng '/usr/local/bin/backupManageer'; Backup manager set ok ( 0.031 s ) |
Now the backup can be triggered for tableset TS1
CGADM > backup tableset TS1; Starting backup .. a ./db/TS1_ticket.xml a ./db/TS1.sys a ./db/TS1.temp a ./db/TS1_data.dat Backup finished successful Backup execution status : OK ok ( 0.522 s ) |
And finally backup mode for tableset TS1 can be finished
CGADM > end backup for TS1 message 'backup for demo done'; Backup mode ended ok ( 0.006 s ) |
8.2.2.2 Internal backup
In this way, a synchronized and consistent copy of the database is made using the sync escape command.
This means, after a consistent checkpoint is written and before the buffer pool is released for further transaction processing, a escape command can be defined to perform a backup of the database.
Since the command is performed using a forked subshell, the escape command contains any shell command which may be useful to perform the backup. We recommend to call a backup utility script to save all required data.
The escape command is given as a string argument to the cgadm sync command.
CGADM > sync tableset TS1 with './saveTS' timeout 4; Tableset TS1 in sync with escape command ok ( 3.012 s ) |
The timeout value is given in number of seconds and specifies maximum time to wait for the escape command to return. If the timeout exceeds, the escape command is aborted and the sync command returns with an error.
CGADM > sync tableset TS1 with './saveTS' timeout 2; ERROR : Timeout occured for command <./saveTS> |
The content of the escape command depends on the kind of backup which is performed. A very simple backup script might look like
#!/bin/bash tar -cvf TS1.tar cegodb.xml cegodb_TS1.sys cegodb_TS1.temp data*.dbf redolog*.log gzip -f TS1.tar |
A very specific form of backup can be made, if the database is located in a ZFS filesystem In this case, a snapshot can be triggered to be saved as the backup.
#!/bin/sh tstamp=`date '+%d.%m.%Y-%H.%M.%S'` snapname=snap-$tstamp zfs snapshot fs@$snapname |
8.2.3 Backup statistics
For statistical reasons, each online backup and synchronization trigger is logged to the backup statistics table. The backup log statistics can be listed with the following command
CGADM > list bustat for TS1; +---------------------+---------------------+---------------------------------------------------+ | BUSTAT | BUSTAT | BUSTAT | | TS | BUINFO | BUMSG | +---------------------+---------------------+---------------------------------------------------+ | 18.12.2012 11:07:26 | BEGIN BACKUP | No message | | 18.12.2012 11:07:30 | END BACKUP | No message | | 18.12.2012 11:12:34 | BEGIN BACKUP | This is a sample backup | | 18.12.2012 11:12:47 | END BACKUP | Sample backup finished | +---------------------+---------------------+---------------------------------------------------+ BUStat info ok ( 0.001 s ) |
The data is written the a table in the system space which is stored persistenly on disk. To clear the backup log statistics, just reset the table with
CGADM > reset bustat for TS1; BUStat reseted ok ( 0.002 s ) |
8.2.4 Recovery procedures
Any performed backup just makes sense, if it can be restored back to the database. The restore process involves copying back the saved files as a first step. If the files are available, the database restore procedure can be triggerd. Either an up to crash recovery can be started up to the latest available transaction in the log. Alternatively, a point in time recovery can be started which recovers the database to a specific point in time. Both methods are described now.
To recover a tableset from an online or offline backup, several steps have been performed. First make sure the corresponding tableset is in offline state. This is done using the cgadm admin client. For the sample tableset TS1, you make
CGADM > stop tableset TS1; Tableset TS1 stopped ok ( 2.004 s ) |
If a backup manager is configured, a previous performed backup can be restored very easily. First get a list of the available backup
CGADM > list backup for TS1; +--------------------------+--------------------------+ | BACKUPLIST | BACKUPLIST | | ID | TS | +--------------------------+--------------------------+ | TS1-20170326-0919 | 2017-03-26-09:19:32 | +--------------------------+--------------------------+ Backup info ok ( 0.017 s ) |
Now trigger the backup manager with the appropriate backup from the list
CGADM > restore tableset TS1 from 'TS1-20170326-0919'; Starting restore .. x ./db/TS1_ticket.xml x ./db/TS1.sys x ./db/TS1.temp x ./db/TS1_data.dat Restore finished successful Restore execution status : OK ok ( 0.423 s ) |
Otherwise, the saved files could by restored manually with approprite shell commands. After successful restore, all required datafiles for the corresponding tableset should be available now. The tableset state is still OFFLINE and it is ready for up to crash or point in time recovery.
8.2.4.1 Up to crash recovery
To recover up the tableset to the last commited transaction ( before crash ), an up to crash recovery can be done. If required, you can set up an external log manager, which provides the requested archive log files in a defined archive destination.
To set up the external logmanager
CGADM > set logmng '/usr/local/bin/cglogmng' timeout 10; Log Manager set ok ( 0.031 s ) |
The configuration can be verified with
CGADM > show logmng; +-------------------------------+------------+ | LOGMNGINFO | LOGMNGINFO | | LOGMANAGER | TIMEOUT | +-------------------------------+------------+ | /usr/local/cgdb/cglogmng | 10 | +-------------------------------+------------+ Log Manager Info ok ( 0.000 s ) |
The logmanager is called with the following synopsis
<log manager program> -t <tableset> -f <archfile> -p <archpath1:archpath2:....> |
The -t argument is the corresponding tableset for which the requested archive logfile should be restored. With option -f the required redo log file is specified und option -p gives the archive log destinations, to which the file should be restored
The log manager return codes are interpreted in the following way. If the return code is 0, the database assumes, that the specified logfile is available now in any of the archive locations and can be used to continue the restore process.
A return code 1 signals the database, that there are no further log files are available. In this case, the restore process will be finished.
In case of any exception, the log manager returns a value of 2. The restore procedure than is aborted and a corresponding error message is returned.
A simple external log manager program might look like
#!/bin/bash

while getopts "t:f:p:" opt; do
    case $opt in
	t)
	    TABLESET=${OPTARG}
	    ;;
	f)
	    ARCHFILE=${OPTARG}
	    ;;
	p)
	    ARCHPATH=${OPTARG}
	    ;;
	\?)
	    echo "Invalid option: -$OPTARG" >&2
	    ;;
	:)
	    echo "Option -$OPTARG requires an argument." >&2
	    exit 1
	    ;;
    esac
done

TAPEPATH=./tape

for i in 1 2 3
do
    if [ -e "$TAPEPATH/$ARCHFILE" ]
    then
	TARGETPATH=`echo $ARCHPATH | awk -F: '{ print $1 }'`
	echo "Restoring $ARCHFILE ..."
        cp $TAPEPATH/$ARCHFILE $TARGETPATH
	if [ $? -eq 0 ]
	then
	    exit 0
	else
	    exit 2
	fi
    fi
    sleep 1
done

exit 1
|
If all available redo log files are already provided in the archive log area, no external log manager is necessary. The log manager then can be disabled by setting it to a value of 'NONE'.
CGADM > set logmng 'NONE'; Log Manager set ok ( 0.031 s ) |
The database recovery process now is started with the following command
CGADM > recover tableset TS1; Tableset recovered to lsn 24506 Recover completed ok ( 2.089 s ) |
After the tableset has been recovered completely, the tableset is in online state and can be used.
8.2.4.2 Point in time recovery
The recovery procedure for a point-in-time recovery is almost identical to the procedure for an up-to-crash recovery. Just an appropriate PIT option is added to the recover command in the following way
CGADM > recover tableset TS1 to '24.12.2012 14:55:00'; Tableset recovered to lsn 23434 ok ( 2.089 s ) |
The string format of the specified date time value can be customized with the DATETIMEFORMAT tags in the database xml file.
8.2.5 Logmanager execution shell
The external log manager is invoked within a forked process embedded in a dedicated sub shell. The execution shell can be customized using the environment variable CGEXESHELL. The variable has to be set up for the shell process, the cego daemon is started from.
To use the GNU bash as the execution shell, you have to set it up with the following command
$ export CGEXESHELL=/bin/bash $ cego --mode=daemon ...... |
If the variable CGEXESHELL has not been set up, the standard execution shell /bin/sh is used for execution.
8.2.6 Log tracing with cglog
With the utility cglog that comes with the cego package, you are table to print the content of a cego logfile
in a readable form. Since the output is well formed, it is also useful for further processing.
This might be useful, to check the consistency of the logfile.
The program is called with the required logfile as an command line argument
$ cglog --log=TS1-3798.dbf |
This prints out the contents of the log in the following form.
LSN=72:LogAction=SYNC: --- No log data --- LSN=73:LogAction=ObjName=t1:ObjType=1:CREATE: --- Log Data Start --- ObjectName: t1 ObjectType: table TableSetId: 1 Table: t1 Schema: TableName: TableAlias: AttrName: a Type: int Len: 4 TableName: TableAlias: AttrName: b Type: int Len: 4 EntrySize = 55 FileId: 0 PageId: 0 LastFileId: 0 LastPageId: 0 EntrySize = 75 --- Log Data End --- LSN=74:LogAction=ObjName=t1:ObjType=0:INSERT: --- Log Data Start --- 1|2| --- Log Data End --- LSN=75:LogAction=ObjName=t1:ObjType=0:INSERT: --- Log Data Start --- 2|3| --- Log Data End --- |
In the first line of each log entry the main log information is indicated. This is the log sequencenumber, the kind of log entry and optionally object context information regarding the corresponding object the log entry refers to. For log entries, which contain additional information, this information is encapsulated in beginning and end control lines.