| 9 Multinode environments ( Cego mode ) |
|---|
| Back to TOC |
For failover and load balancing reasons, cego provides a distributed tableset shadowing concept. Based on the previous described database administration features, further commands enable the administrator to switch over any tableset to another compute node.
9.1 The Cego role concept
In general, Cego provides three roles for a compute node. The mediator node is the controlling host for each administration action which is performed on a tableset. Administration requests for starting, stopping, adding datafiles and so on are handled by the mediator host and are dispatched to the corresponding primary and secondary nodes. In case of any primary node failure, the mediator decides what subsequent actions are required to bring the tableset up again.
The primary node is the active node for the tableset. In this role, the primary node receives all corresponding database user requests for the tableset. Furthermore, the primary nodes sends all collected log information to the secondary node.
AS a third role, the secondary receives transaction log requests from the primary and manages a shadow database, which can be activated on demand. In this sense, the secondary works as a spare node for a fast tableset takeover.
The following picture illustrates the general role concept and a complete shadow switch cycle in a three node environment for any tableset.
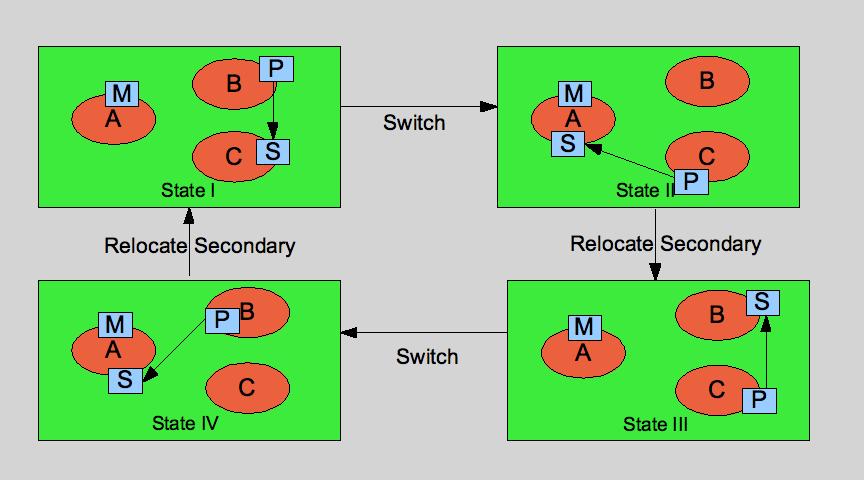 |
In State I, the mediator role is assigned to node A. The tableset is located on node B and log shipping is done to the secondary node C. Now we assume, node B fails for any reasons. As a consequence, a tableset switch should be done to the secondary node B. Since the database is already recovered to the last completed archive logfile, the recover up to crash can be done in short time. In this situation marked as state II, the mediator is the available node to takeover the secondary role. From this point, all subsequent log entries are shipped to node A. If node B is not available soon again, an initial copy should be performed to node A using the copy command. Otherwise, the secondary can be relocated to node B ( or any other node, joining the group ). An initial copy to node B again brings the tableset into a synced state III.
Another switch changes to role of primary and secondary again to system state IV. With a relocation and initial copy the original system state can be reached.
9.2 Administration
In the following section, all administration management issues are discussed for a multinode environment. For this, you should be familiar with the cgadm administration program.
9.2.1 Multinode preparations
As a prerequisite, the Cego database daemon program system be installed on three different compute nodes. For testing reasons, BSD jails or Solaris container are fine. For real load balancing and redundany reasons, the daemons should run on different physical nodes. Each node should provide the same directory structure for the corresponding database files. In the following section we assume the following roles for a mutinode setup
| Role | Hostname |
|---|---|
| Mediator | cego01 |
| Primary | cego02 |
| Secondary | cego03 |
As an initial database configuration file, the following template cegodb.xml can be used.
<?xml version="1.0" ?> <!DOCTYPE CEGO_DB_CONFIG> <DATABASE NAME="cegodb" PAGESIZE="16384" ADMINPORT="2000" LOGPORT="3000" DATAPORT="2200" PIDFILE="./pid" MAXFID="40" MAXTSID="1"> <USER USER="cgadm" PASSWD="$1OkhCMBQ/sl2"> </USER> </DATABASE> |
On the mediator host, the cego daemon now can be started up
$ cego -d cegodb.xml |
On the primary and secondary nodes, the daemons are started up in the following way
cego -d cegodb.xml -m cego01:2000:cgadm:cgadm |
The option -m indicates, the the daemon should retrieve it's database configuration file from the specified host. The file is locally stored to the filename given with the -d option. This ensures a consistent database startup configuration for each of the nodes.
9.2.2 Creating a multinode database
Creating a multinode tableset requires some more steps to enable the distributed features. In a first step, the tableset is defined using the cgadm administration tool.
For this, connect to the mediator host cego01 and define the tableset ts1 as followed
CGADM > define tableset ts1 tsroot='./' primary='cego02' secondary='cego03'; primary on cego02 : Table set defined secondary on cego03 : Table set defined mediator on cego01 : Tableset defined ok ( 0.040 s ) |
If the tableset primary node cego02 and secondary node cego03 could be connected and setup, the tableset is now defined in a distributed way. As a consequence, the primary and secondary should begin to heartbeat to the mediator. After some seconds, you should see both hosts online
CGADM > list node; +---------------------+-----------+ | NODEINFO | NODEINFO | | NAME | STATUS | +---------------------+-----------+ | cego01 | ONLINE | | cego02 | ONLINE | | cego03 | ONLINE | +---------------------+-----------+ Node Info ok ( 0.001 s ) |
If online, the nodes are ready to receive configuration messages. As next, we add a datafile to the tableset.
CGADM > add datafile './data01.dbf' size 200 to ts1; primary on cego02 : Data file ./data01.dbf added secondary on cego03 : Data file ./data01.dbf added mediator on cego01 : Added datafile ok ( 0.036 s ) |
For the shadow logfiles on the secondary host, a valid archive log locations must be defined.
CGADM > add archlog AL1 path './arch' to ts1; primary on cego02 : Archlog ./arch added to ts1 secondary on cego03 : Archlog ./arch added to ts1 mediator on cego01 : added archlog locally ok ( 0.036 s ) |
Please make sure, the specified archive path is valid and accessible for the primary and secondary node. For access the tableset data, we add a tableset user
CGADM > add user lemke identified by 'lemke' to ts1; primary on cego02 : User lemke added secondary on cego03 : User lemke added mediator on cego01 : Added user locally ok ( 0.038 s ) |
Now we can create the tableset
CGADM > create tableset ts1; primary on cego02 : Table set created primary on cego03 : Tableset syncstate set secondary on cego03 : Tableset runstate set secondary on cego03 : Tableset syncstate set mediator on cego01 : Tableset created ok ( 0.089 s ) |
The tableset now is created on the primary node. Since the secondary node still is not in sync, this is indicated by the status check.
CGADM > check tableset ts1; +-----------+-------------+-------------+-------------+ | CHK | CHK | CHK | CHK | | ATTRIBUTE | cego01 | cego02 | cego03 | +-----------+-------------+-------------+-------------+ | RUNSTATE | OFFLINE | OFFLINE | OFFLINE | | SYNCSTATE | NOT_SYNCHED | NOT_SYNCHED | NOT_SYNCHED | | PRIMARY | cego02 | cego02 | cego02 | | SECONDARY | cego03 | cego03 | cego03 | | MEDIATOR | cego01 | cego01 | cego01 | +-----------+-------------+-------------+-------------+ primary on cego02 : TS Info secondary on cego03 : TS Info mediator on cego01 : check done ok ( 0.039 s ) |
9.2.3 Tableset Copy
A tableset copy has to be performed, if the tableset is not in sync with the secondary node. This may occur for several reasons. Either the secondary node has been restarted To get the tableset in sync, it has to be copied to the secondary node. The copy process is started with the copy command.
CGADM > copy tableset ts1; secondary on cego03 : Stopped recovery primary on cego02 : Starting asynchronous copy ok ( 0.043 s ) |
In our sample, an offline copy of the tableset is performed. If online, backup mode is started for the tableset an an online backup is transfered to the secondary. If finished, the tableset status is changed to sync state
CGADM > check tableset ts1; +-----------+-------------+-------------+-------------+ | CHK | CHK | CHK | CHK | | ATTRIBUTE | cego01| cego02 | cego03 | +-----------+-------------+-------------+-------------+ | RUNSTATE | OFFLINE | OFFLINE | OFFLINE | | SYNCSTATE | SYNCHED | SYNCHED | SYNCHED | | PRIMARY | cego02 | cego02 | cego02 | | SECONDARY | cego03 | cego03 | cego03 | | MEDIATOR | cego01 | cego01 | cego01 | +-----------+-------------+-------------+-------------+ primary on cego02 : TS Info secondary on cego03 : TS Info mediator on cego01 : check done ok ( 0.016 s ) |
9.2.4 Tableset Startup
The startup on of the tableset on the primary node also starts up the database in recovery mode on the secondary node. The logfiles written and completed on the secondary node, are immedialety recovered.
CGADM > start tableset ts1; primary on cego02 : Tableset started secondary on cego03 : Starting recovery ... mediator on cego01 : Tableset ts1 started ok ( 0.096 s ) |
Again, the actual state of the tableset can be checked with the check command. The tableset should be online and in sync for all three involved nodes.
CGADM > check tableset ts1; +-----------+-------------+-------------+-------------+ | CHK | CHK | CHK | CHK | | ATTRIBUTE | cego01| cego02 | cego03 | +-----------+-------------+-------------+-------------+ | RUNSTATE | ONLINE | ONLINE | ONLINE | | SYNCSTATE | SYNCHED | SYNCHED | SYNCHED | | PRIMARY | cego02 | cego02 | cego02 | | SECONDARY | cego03 | cego03 | cego03 | | MEDIATOR | cego01 | cego01 | cego01 | +-----------+-------------+-------------+-------------+ primary on cego02 : TS Info secondary on cego03 : TS Info mediator on cego01 : check done ok ( 0.016 s ) |
9.2.5 Tableset Switch
A tableset can be switched using the following command
CGADM > switch tableset ts1; primary on cego02 : Tableset stopped primary on cego02 : Tableet nodes set secondary on cego03 : Stopped recovery secondary on cego03 : Tableet nodes set secondary on cego03 : Tableset started mediator on cego01 : Switch done ok ( 2.064 s ) |
CGADM > check tableset ts1; +-----------+-------------+-------------+-------------+ | CHK | CHK | CHK | CHK | | ATTRIBUTE | cego01 | cego03 | cego01 | +-----------+-------------+-------------+-------------+ | RUNSTATE | ONLINE | ONLINE | | | SYNCSTATE | SYNCHED | SYNCHED | | | PRIMARY | cego03 | cego03 | | | SECONDARY | cego01 | cego01 | | | MEDIATOR | cego01 | cego01 | | +-----------+-------------+-------------+-------------+ primary on cego03 : TS Info mediator on cego01 : check done ok ( 0.025 s ) |
9.2.6 Relocating Tableset Secondary
A tableset can be relocated with the following command
CGADM > relocate secondary for ts1 to 'cego02'; primary on cego03 : Tableset ts1 log to cego02 primary on cego03 : Tableset syncstate set primary on cego03 : Tableet nodes set secondary on cego02 : Propagate TS Info secondary on cego02 : Tableset ts1 log to cego02 secondary on cego02 : Tableset runstate set secondary on cego02 : Tableset syncstate set secondary on cego02 : Tableet nodes set mediator on cego01 : Secondary relocated ok ( 0.064 s ) |
CGADM > check tableset ts1; +-----------+-------------+-------------+-------------+ | CHK | CHK | CHK | CHK | | ATTRIBUTE | ceg01 | cego03 | cego02 | +-----------+-------------+-------------+-------------+ | RUNSTATE | ONLINE | ONLINE | ONLINE | | SYNCSTATE | NOT_SYNCHED | NOT_SYNCHED | NOT_SYNCHED | | PRIMARY | cego03 | cego03 | cego03 | | SECONDARY | cego02 | cego02 | cego02 | | MEDIATOR | cego01 | cego01 | cego01 | +-----------+-------------+-------------+-------------+ primary on cego02 : TS Info secondary on cego01 : TS Info mediator on game : check done ok ( 0.045 s ) |
9.2.7 Node expansion
If a single node database configuration already has been set up, it is possible to expand the configuration to a multinode configuration. For this, the mediator host and secondary host have to be relocated. The expansion procedure is described in the following
As a first step, two further nodes have to be attached to the cego system. It is assumed, that on one node ( cego01 ), a cego database daemon is already running. Now further nodes cego02 and cego03 should be attached. On both nodes we invoke the cego daemon with
cego -d cegodb.xml -m cego01:2000:cgadm:cgadm |
If all daemon programs are up and running, the mediator and secondary are able to be relocated as illustrated in the following picture
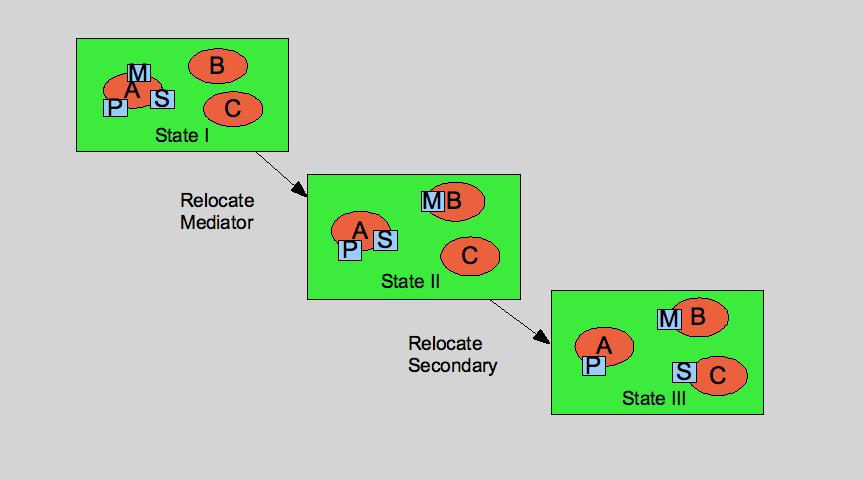 |
First, the mediator is relocated. This is done with
CGADM > relocate mediator for ts1 to 'cego02'; |
As a consequence, the node cego01 has lost the mediator status for tableset ts1. To proceed, you have to connect to cego02 now ( see section cgadm for more information how to use cgadm ) Connected to the new mediator host cego02, the secondary can be relocated to cego03
CGADM > relocate secondary for ts1 to 'cego03'; |
After relocation, an initial tableset copy is required.
CGADM > copy tableset ts1; |
9.3 Distributed queries
TODO
TODO |